My Olympus E-PL1 Workflow and Re-Review

Okay, as promised in my previous post, you shall see my crappy shots in this post. Again, I seriously think my shots aren’t half as good as some of those Olympus Brand Store Guys. But, still I really enjoyed the shooting session with the whole bunch of them. Join me for photography workshop in future. It’s fun!

I have been getting quite a number of questions emailed to me regarding the use of the Olympus digital PEN E-P1/2/L1… so I’ve decided to list down here how I usually “manage” the camera.

1. I shoot in P mode when I just wanna concentrate on getting the shot, the expression, the action, irregardless of the depth-of-field. In fact, I want a deeper depth-of-field in order to quickly capture a moment, minimizing the risk of getting things out-of-focus. “F8 and be there.” Like Weegee said.

2. Using the camera in P mode when there’s sufficient light, i.e. when ISO does not automatically go up to 1600 with corresponding aperture of F3.5-5.6 for the kit lens is fine for the “F8 and be there concept”. Yes, I use Auto-ISO too. Sometimes, when I want more control, I will set the ISO manually.

But for lowlight usage, WATCH your shutter speed. Even with the Image Stabilization (IS) ON, a slow shutter speed CANNOT freeze action. Image Stabilization helps to capture non-moving subjects in sharpness when shutter speed is slow.

3. To speed up the camera, I always TURN OFF the automatic preview on my LCD and use my camera in Sequential Shooting Mode. To capture a certain action, I usually shoot 2-3 frames to get the best shapes and forms. I also hardly “chimp”, i.e. look at previews when I shoot. I don’t wanna lose a moment while “chimping”!

4. In my personal opinion and experience with different brands of digital cameras, I found out that Olympus’s RAW files are not all that “tweakable” as compared to the other brands. I figured out that since I am not getting a whole lot more from it’s RAW files, unlike the Canons or Nikons where the tolerance can go as far as 3-4 stops, I’d rather shoot Olympus JPEGs. I also figured out that the Normal JPEGs are good enough for me for general usage as I find no visible difference comparing them to the Fine JPEGs.

However, if I need to use the camera to shoot any stuff that’s exceptionally important, I will still shoot RAW, more for my mental and emotional consolation. Olympus’s JPEGs are about the BEST you can find in the world. The only other brands which I think can come close to it are Leica and maybe Pentax. Okay, I know I may sound subjective, but look at the skin tones! Any colors on any inanimate objects can lie BUT skin colors DON’T LIE! (If you still disagree with me, okay.. it’s my personal taste, alright?)

5. The E-PL1 has much lesser noise at high ISOs as compared to the E-P1 and E-P2, so I am more confident using it at ISO1600-3200.

6. According to Steve Huff’s review, he complained that the movie-record button on the E-PL1′s back can be easily and accidentally depressed BUT I have since found out that it only takes less than 5 steps to OFF the switch permanently in the menu system! No Issue At All! Just OFF it and use the same shutter button for recording video and stills. (Menu-Button-oFunction-Off)

7. I shoot in A mode when I wanna shoot at specific apertures to achieve the depth-of-field I want.

8. I prefer P mode over the E-PL1′s i-auto mode as I don’t like the i-enhance to be always ON as it does in the i-auto mode. Personal preference.

9. Generally, Olympus JPEGs can be a little under-exposed. So some brightening is usually necessary at post-processing. Or for the E-PL1 users, you can choose to use it’s Live Guide, which is “idiot-proof”. If you know digital cameras, a little under-exposed is definitely better than over-exposed as burnt highlights in digital files can never be restored.

10. When using the Pin-hole Art Filter, images may seem a little under-exposed too, so some brightening at post-processing stage will be good.

11. When using the Grainy B&W Art Filter, avoid high contrast scenes as highlights can easily be washed out!

12. If you are a fervent Art Filter Fan, I suggest you shoot RAW and choose your desired Art Filter in Olympus Software afterwards so you can enjoy shooting without having to wait for the “almost forever” in-camera Art Filter processing. Those few seconds can mean eternity when you are out there.

Okay, finally, there’s ONE THING I hate about the E-PL1!

It DOES NOT HAVE AN ORIENTATION SENSOR! Which means, I have to manually rotate all my vertical shots! Olympus, is it that expensive to have this included in the E-PL1? This should already be the norm among all digital cameras of year 2010!

Here are my shots from the street shoot, constructive comments are welcomed!

Drying her hair by the roadside, hip shot.

Pinhole Art Filter Effect

Prostitute outside motel entrance, hip shot. I forgot to watch my shutter speed!

panned shot of man walking past

HOT!

Fierce! Hip Shot.

Pin Hole Art Filter

Travelling

My small reflection in-between.

Beggar

Security Guard

Summon!

Diorama Art Filter

Diorama Art Filter

Pop Art Filter, shot by manually focusing till patterns appear

The following are two shots by the NEW 9-18mm M-Zuiko Lens. This is such a small, compact and sharp lens with good close focusing distance! It’s in stock!

Shot with NEW 9-18mm M-Zuiko Lens

Another shot by the NEW 9-18mm M-Zuiko Lens

Lastly, the bunch of Olympus PEN Street Shooters! Shot by a stranger. Isn’t it great to have an “idiot-proof” camera for a stranger to hold? I’m sure the in-camera IS helped. LOL…

Malaysia Olympus Brand Store Street Shooters!

Related Posts:

1. BEST Street Photography Machine

2. Photo-enthusiasts ROCKS!

3. The Power of Small Cameras

4. E-PL1 Review

5. More about the E-PL1

E-PL1 with Nokton 50mm F1.1 Night Shoot 2329-2353hrs

Olympus E-PL1 with Voigtlander Nokton 50mm F1.1 via adapter

Side View of Olympus E-PL1 with Voigtlander Nokton 50mm F1.1

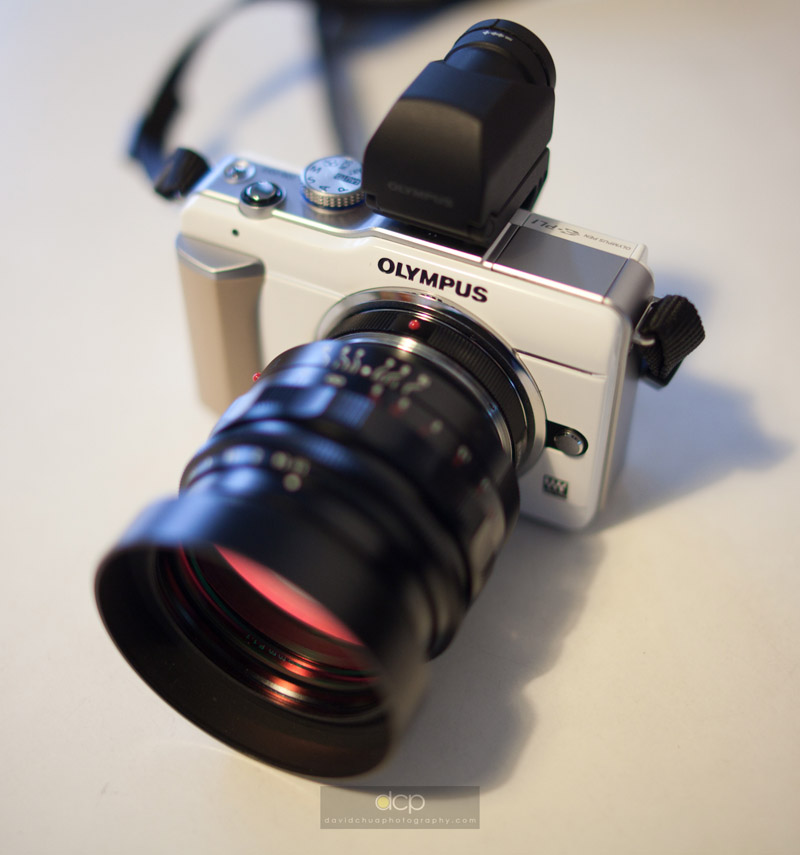
All the following images shot wide open at F1.1 using Olympus EVF2 to manual focus. Hit Rate: 10/10. No Live View Magnifying needed. Amazing EVF! Olympus Engineers must be Darn Proud of this creation!

Clearing Trash

Bokeh Test - 01

Bokeh Test 02

Closed for Business

Midnight Smile

"Wi-Wa-ers" TEA

Marche "Umbrellas"

Mystery Band

Midnight Melody

Starry Starry Night

No, I shot this on a WEDNESDAY.

Chill Out

Chilling out too

Music DJ

It's a "NO-FOOTBALL-DAY"!

"Stop Smoking, ok?"

White Shoes

White Dresses

As you can see, it’s an amazing small little camera! Micro-four-thirds is a system that GROWS with you. From the simplest kit lens usage in iAuto or P mode to using the A/S/M mode to using the built-in ART FILTERS to using Manual Focus lenses via adaptors to using it’s HD Video… … it’s almost limitless! Being much smaller than a typical DSLR, I truly enjoyed my night shoot! Communicating with my subjects was much easier cause I wasn’t using a huge DSLR which looks like a press photographer (Oh, I pray the Press Photographers don’t use such small cameras to spoil my street shoots one day… LOL…) Communicate? Yes, I do try to communicate when I can, mostly by my body language and sometimes a chat.

Related Posts:

1. E-PL1 and MFT experiences

2. E-PL1 vs GF1

3. E-P2 Review

4. The Power of Small Cameras

5. E-P1 Review

More about the Olympus E-PL1 and my experience with MFT

I’d like to share what I think I missed out in my previous post about the comparison between the Panasonic GF1 and the E-PL1. Also, I’d like to share a short summary of what cameras I have been using during the couple of months I went missing from this blog early this year.

Basically, from the E-P1, I switched to the E-P2. At first, my initial impression of the E-P2′s EVF2 (external electronic viewfinder) wasn’t so impressive. Yes, up till today, it is the highest quality electronic viewfinder you can ever find on earth, no other brands can match it yet. The Panasonic GF1′s EVF really sucks badly when you compare them side by side.

But in my then E-P2 Review, I wrote that looking through the EVF is no different from watching Live View through a peep hole. In the months when I went missing from this blog, I found out that this wasn’t true! The Olympus’s EVF2 is about the ONLY thing in the world today which can make Manual Focusing of old SLR lenses, Leica M-Mount lenses, and even the C-Mount lenses on the Olympus PEN E-P2 and E-PL1 POSSIBLE!

I get as high as 10/10 hit rate in terms of nailing my focus using the EVF2 on my E-P2, even when I was using the Voigtlander Nokton 50mm F1.1 lens wide open! Using Live View to manual focus is just too time-consuming, too tedious and too slow!

Yes! The Micro Four Thirds Mount can mount almost limitless types of lenses on it via adapters! And China make most of these adapters at really affordable prices! The Micro Four Thirds System shall rock the world of photography!

I shall write more about using these various lenses in my next few posts, so stay tuned.

After switching to the E-P2, I started my indulgence into using the EVF2 to manual focus with all sorts of manual focus lenses (including old Olympus SLR OM lenses, of course). This is addictive! At the same time, I tried out the Panasonic Lumix MFT lenses.

And finally, the road led me to the E-PL1. (For buddies who have been hanging out with me, they also saw my indulgence into many other types of cameras… Leica being one of my favourites! Haha… sinful… )

An overall experience told me that for AF lenses, my favourite is the Lumix 20mm F1.7. As for MF lenses, there are quite a few I really like: the Nokton 50mm F1.1, and the C-Mount Ampex 25mm F1.4 TV lens in particular.

I prefer the look and feel of the E-P1 and E-P2, but I think the E-PL1 is currently the most practical choice for me. The E-PL1 is a more intelligent camera, produces sharper and nicer images, is smaller and lighter, and more comfortable to hold. However, I really hate the menu system. According to Olympus, this camera is supposed to be simpler and easier to use. But I find it otherwise.

Fiddly Menu in the E-PL1, CW trying hard to find out how to switch apertures. This image is captured with my iPhone.

Both CW and I were having a hard time trying to find out how to switch apertures. We, like most of you out there, don’t read menus! Haha…

And on a separate occasion, I passed the E-PL1 to another of my photo-enthusiast friend to try out, he had a hard time trying to change ISO.

What is this??? Is it just us being “too advanced” to understand the “simpler” menus in the E-PL1, or is Olympus misunderstanding what the consumers need? Sometimes in trying to make something simpler, we made it more difficult. Less is More? Simpler is Complicated? Hahaha….


Just to share some E-PL1 shots here, all with minimum tweaking, Olympus is famous for beautiful digital images straight out of camera!

A quick shot of the busy Satay Man. ISO1600, F5.6, 1/20s.

Trying out the POP UP FLASH in E-PL1 … …

Personally, I wouldn’t bother much about pop-up flashes, since all pop-up flashes in the world do not produce as pleasing results as external hotshoe flashes which can bounce. Bad lighting? I’d rather not shoot. Pop-up flashes aren’t gonna make it much better.

Shot by CW.

The E-PL1 is also perfect for hip shots:

Hip Shot of Uncle, a little post-cropping done. ISO200, F7.1, 1/250s.

Corn Salesman. Shot from hip level using Live View. Something not possible with my Leica M6 and M8. ISO200, F3.2, 1/200s.

The above images speak for themselves Olympus’s image qualities!

I imagine one day, I show my son a photograph of a morning glory and teach him what’s purple, he replies, “It’s BLUE!” And I will say, “Oops! That’s Panasonic!”

I’d rather go for the E-PL1. :p

Related Posts:

1. GF1 vs E-PL1

2. E-P2 Review

3. E-P1 Review

Olympus E-PL1 vs Panasonic Lumix DMC-GF1

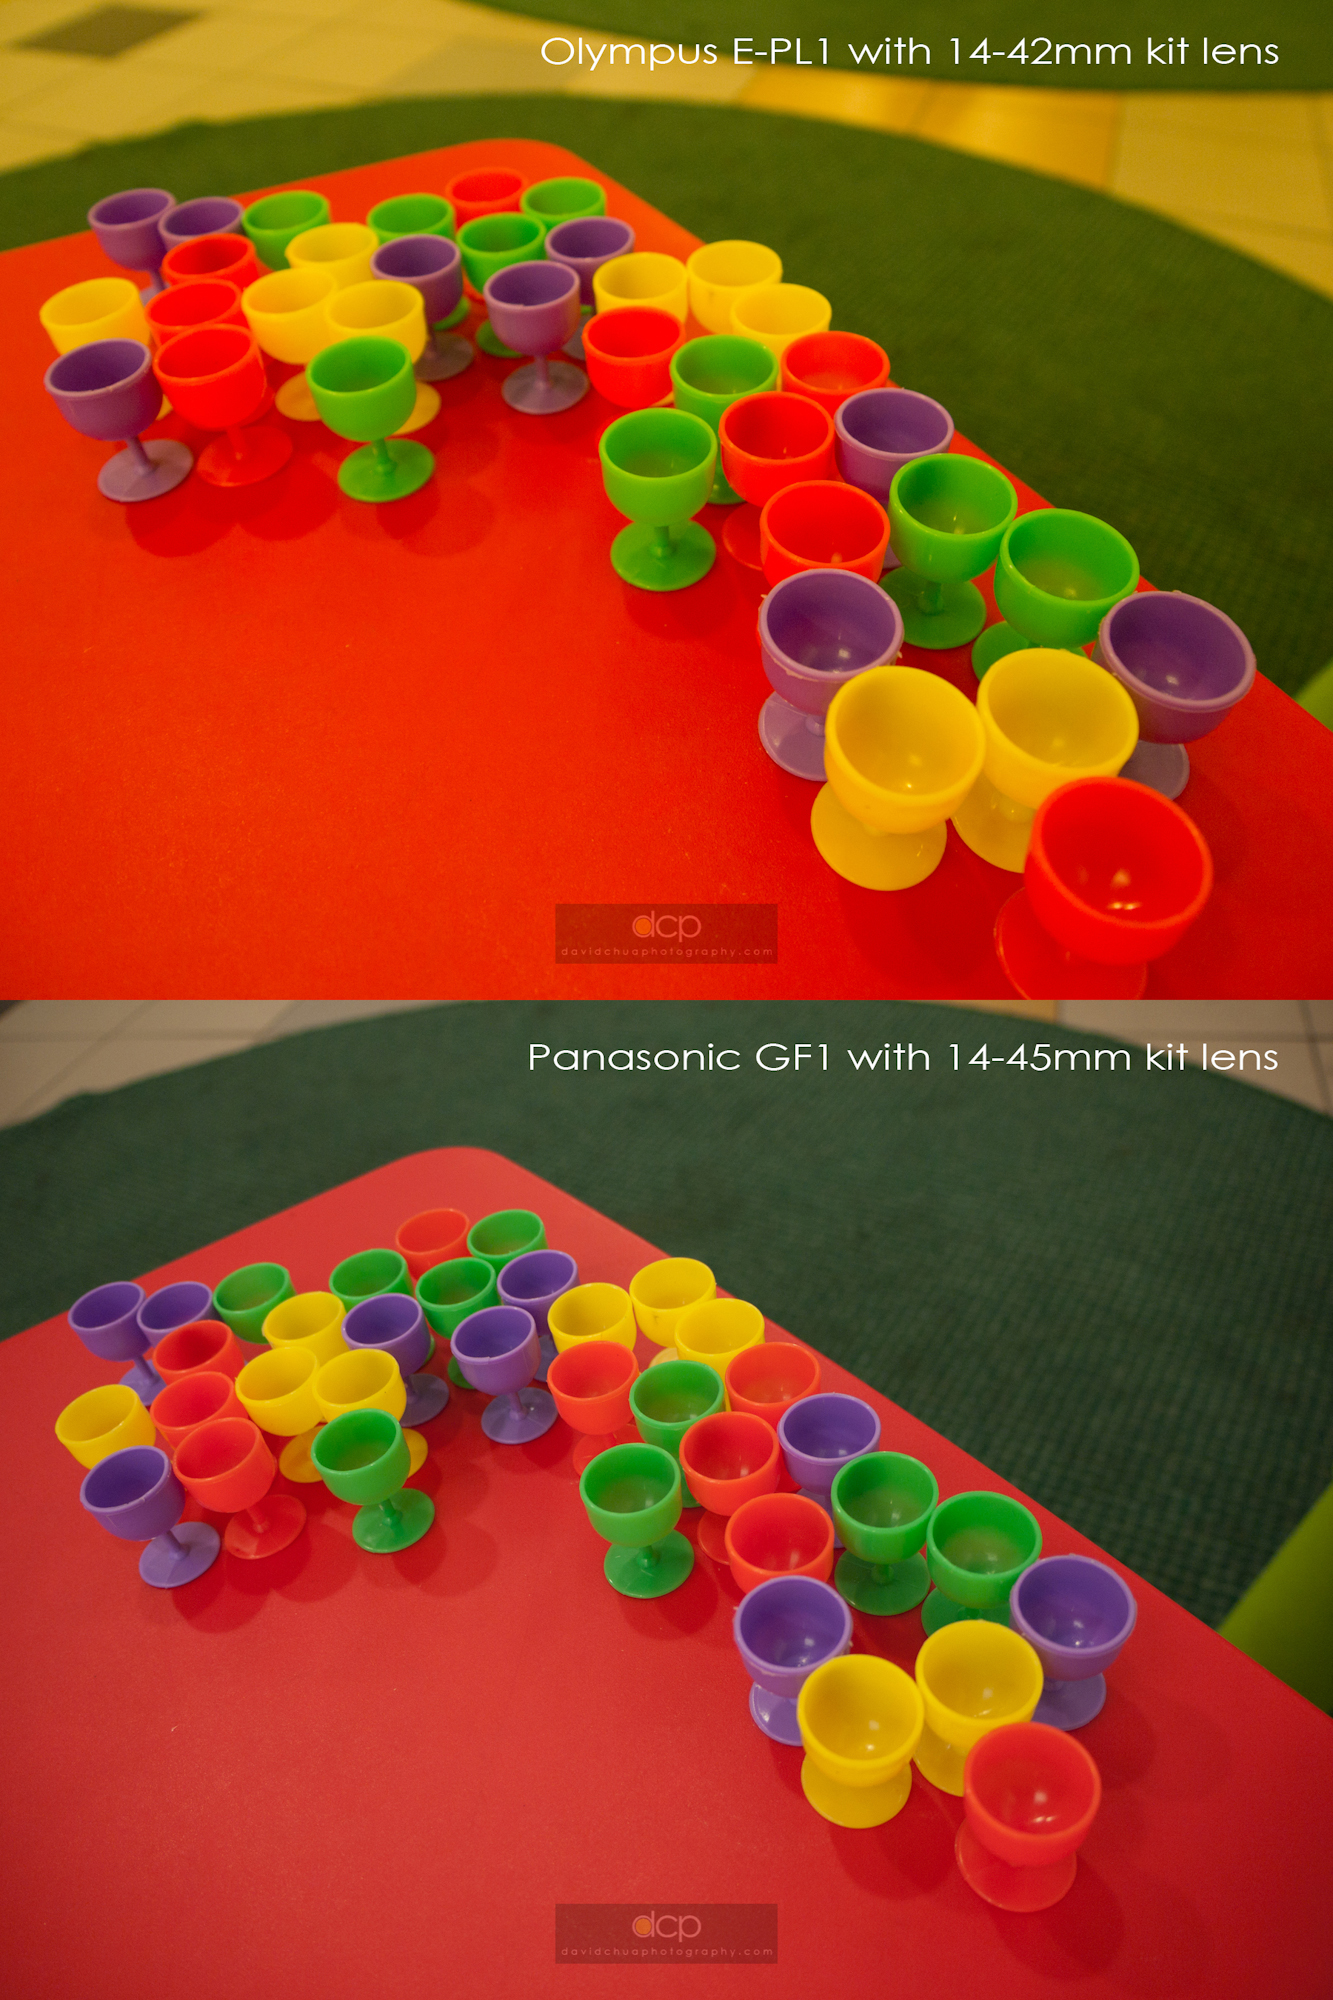
Finally, I have now got hold of the Panasonic GF1 with it’s Lumix 14-45mm kit lens (Thanks to my friend CW) and the latest Olympus PEN E-PL1 with it’s M-Zuiko digital 14-42mm kit lens! Now, this shall be a FAIR COMPARISON, as much as possible, as both are with their standard kit zoom lenses.

I am writing this review of comparison between the two cameras in the SIMPLEST manner I can think of, yet hopefully good enough for the layman, and even for one who has ZERO knowledge of cameras and photography, to make a clearer decision between the two, i.e. WHICH TO BUY?

NO REVIEWER IS 100% BALANCED. So, make your own conclusions!

We have to understand that both cameras’ main target audience are NOT the Professionals. The main target audience are consumers, ordinary students, daddies, mummies… and photo enthusiasts who want something small to carry with them daily… yet something that way surpasses the usual compact digital cameras’ standards in image quality and handling.

We have also seen the Micro-four-thirds cameras landing in the bag of professionals as a leisure camera, second camera or a backup camera, and some use it for work like myself, or Kirk Tuck.

BUT this review is aimed NOT at the professionals.


In this review, I shot with both cameras set to iAuto Mode. I used them in my everyday life. I shoot like an ordinary Daddy, like what every dad would want to photograph his child. I used both cameras NO DIFFERENT from any of you out there. So, the images I am gonna present here are NO GALLERY PRINTS. :p

My Workflow:

Shot with both cameras using RAW, iAuto Mode. I used them in Normal Circumstances as an ordinary guy in his everyday life, shooting in shopping centres, shooting his own kid, shooting at home and wherever he goes. All images are converted to JPGs using Lightroom Beta 3 version in default mode with no additional modification to the files at all, not even exposure, just to show you what comes out straight from the cameras.

WHY SHOOT in iAUTO MODE?

These Micro Four Thirds cameras are meant to produce amazing pictures straight off the camera without having to adjust much settings. If I want a camera to adjust it’s settings as a playtime, it would be the Nikon D700 or the Nikon D3s. There is at least 100 menu options in them to choose from. Now, at least in my personal philosophy, I expect the camera to meet or exceed my expectations at it’s so-called most intelligent “iAuto Mode”!

iAuto Mode is supposedly much better than P (Program)Mode, or in Cantonese as a joke, what we call the “PUN” Mode (basically means “idiot mode”). It’s supposed to be much more intelligent than the P Mode. Now let’s see how “intelligent” each camera behaves… … here we go… …

NOTE: All images are uploaded in the highest tolerable resolution online in this blog possible for you to download and pixel-peep. To do that, keep clicking on image till you can right click and save the high resolution file.

1. Indoor Artificial Lighting Condition – Shopping Centers (Most digital cameras suck at this)

Verdict:

Digital cameras have always got a problem with reds. There are very few digital cameras that can reproduce red accurately. As both shots were shot in iAuto Mode, white balance was AWB(auto). In this instance, Olympus over-cooked the reds and Panasonic produced more neutral colors.

2. Action Shots Indoors using iAuto Mode

Verdict:

In handling the cameras, immediately you will feel that GF1′s auto-focusing is faster and seems more decisive and definite. Initial impression is that the GF1 “found” focus and snapped the shutter much faster than the E-PL1. BUT upon scrutinizing both cameras’ files in my computer, I have found that the GF1 may have activated it’s shutter much faster and easier than the E-PL1 but to my disappointment, the hit rates are just as bad as the E-PL1! The number of “useable” images shot in iAuto mode for both cameras, chasing after running kids, are just about the same amount! We are talking about nailing the focus.

Suggested Solutions:

A. Buy a DSLR which performs well through ISO3200 and above like the latest Canon 550D which is good through ISO6400

OR

B. Use ISO1600 on either the E-PL1 or GF1 coupled with a fast lens like the Lumix 20mm F1.7. Shoot RAW and convert using Lightroom or Photoshop and you get lesser noise than direct JPGs straight out of camera.

3. Macro Test, using the minimum focus distance on each lens

Verdict:

It is quite clear that the E-PL1′s 14-42mm kit lens has a much closer focusing distance which gives higher magnification though it underexposed. But just a little exposure adjustment either in-camera when shooting or in your computer will bring it’s shine back easily!

4. i-Auto Intelligence in using In-Body Image Stabilization and Lens Optical Stabilization in lowlight conditions

Verdict:

It’s not fair to say that Olympus’s in-body I.S. is better than the Panasonic lens’s O.S. here as the iAuto mode in both cameras gave a drastic difference in ISO, which results in different shutter speeds.

But what we can see here, and from all the above examples so far is that Panasonic tends to give a lower ISO which results in slower shutter speeds. In this instance, the intelligence in the E-PL1 beats the GF1.

Panasonic should learn that it’s lens’s O.S. is not good enough for 1/8s in it’s iAuto Mode! Having this happened in iAuto Mode is quite unforgivable unless they are like the Nikon guys who expect us to dabble an hour or two with it’s menu before shooting. Unlike Olympus, I have done many shots with the E-P1 and E-P2 at shutter speeds as slow as 1/2s and achieved sharp images using it’s in-body image stabilization!

5. Daylight Photography

Now, by today’s digital photography technology standards, all cameras should already have no problems rendering DAYLIGHT images. Let’s see … …

Again, the reds are different here. Maybe it’s just “different film” we are looking at here? Which “film” do you prefer? Also, the iAuto on both cameras focused differently. But this can be done manually by “re-focusing” the camera (just let go of shutter button and press another few times till desired focus point is achieved or manually select focus point).

Digital cameras not just have a thing about the reds but also the purples. Both cameras rendered purple very differently. If we talk about reality, Olympus rendered purple as purple, much closer to the real colors. As for the Panasonic, morning glory has turned blue.

My boy wanted rain in such extremely hot season lately. Personally, I prefer the greens from the Olympus in these shots.

Next, we look at the ergonomics of both cameras.

Front View of Olympus E-PL1 and Panasonic GF1

Back to Back - Olympus E-PL1 and Panasonic GF1

Olympus's 14-42mm Kit Lens collapsed to it's smallest size on E-PL1 vs Panasonic GF1

Both Cameras at 14mm

Both Cameras at maximum focal length, Olympus at 42mm and Panasonic at 45mm

Verdict:

1. Panasonic doesn’t seem to understand the power of Micro Four Thirds is in it’s SIZE too. The pursuit of producing High Quality Cameras in the smallest size possible. Even Ricoh understood that! (Beautiful GXR!) It’s either we settle down on the size of a typical DSLR or we go really small.

2. The collapsible Olympus kit lens is even lighter than the ones that came with the E-P1 and E-P2 this time, having a plastic mount. The front element when extended still is wiggly though it does not affect it’s function at all. If you want something real solid, go for the Leicas. :p

3. The grip on the E-PL1 feels much better and more comfortable than the GF1. The GF1 is a little heavy for it’s smooth grip.

4. The shutter sound on the E-PL1 sounds nicer to me. The GF1 sounds clanky.

5. Though the GF1 seems quicker in releasing it’s shutter, results have shown it does not necessarily means nailing the focus better than the E-PL1.

Overall, the GF1 looks more classy, expensive and professional and the E-PL1 looks more plasticky BUT I personally prefer the lightweight E-PL1 and it’s overall image performance. Again, if I want something real professional, classy and small, it will be either the Leica M8 or M9.

As compared with the E-P1 and E-P2, this is what I discovered:

1. The E-PL1 is much sharper than both E-P1 and E-P2.

2. The AF on the E-PL1 is slightly faster than the E-P1 and E-P2. The AF is exceptionally fast with the NEW m-zuiko 9-18mm lens. This one I hope I can get a copy for further review at a later stage but I tried it once and it was really impressive!

3. The E-PL1 is more intelligent in handling backlit situations. It is also overall more intelligent than the E-P1 and E-P2.

I hope I have not made people more confused and all the effort I put in this post helps someone out there. :) Cheers!

Bookmark me, subscribe to my blog, comment or email me to make a friend. Stay tuned for more updates very soon!

Related Posts:

1.  Olympus E-P2 Review

2. The Launch of Olympus E-P2

3. Event Shoot using E-P1

4. Olympus E-P1 Review

5. Wedding by E-P1

Olympus PEN E-P2 Review

Basically, the new added features on the PEN E-P2 are quite minimal. The main differences of the E-P2 vs the E-P1 are:

1. Two NEW ART FILTERS: Cross Process and Diorama,

2. A hot shoe for the highest quality Electronic External Viewfinder currently in the market, in which the same hotshoe is used for the Olympus external mic to collect the best quality sounds during HD video recording,

3. Focus-tracking (it locks the focus on a moving subject. Unfortunately, I tried engaging the continuous-shot/sequential-shot mode but it failed. Focus-tracking can only be used on single-shot mode.),

4. I-enhance mode (if you are a MAC user, it’s like the “enhance” button in “IPhoto”. It does improve the colors.),

5. You can now use remote control to control your slideshow-viewing when the camera is connected to the HDTV via HDMI cable.

Below are some shots I did with the new Art Filters. To show the effects of Cross Process, I did an extreme comparison with the Pop Art filter to show the differences in color rendition. To me, Pop Art gives a “Leica-like” or color slides kind of saturation. Traditionally, if you print a color slide on a photographic print, you get real saturated colors. “Cross Process” brings the colors to another extreme.

Comparison between Pop Art Filter and Cross-Process Filter

Comparison between Pop Art Filter and Cross Process Filter

Cross Process Effects:

Uncleared mess from a torn-down building with apartment flats in the background

Uncleared mess from a torn-down building with apartment flats in the background

Reflection on the ground

Reflection on the ground

My Reflection

My Reflection

Now I know some helicopters have 5 propellers

Now I know some helicopters have 5 propellers

A Corridor View of a Typical HDB Flat in Singapore

A Corridor View of a Typical HDB Flat in Singapore

Malaysia LRT

Malaysia LRT

View from Overhead Bridge, Malaysia LRT

View from Overhead Bridge, Malaysia LRT

Boy waiting on staircase

Boy waiting on staircase

In film days, cross-processing is done by either shooting color slides and processing them using color negative chemicals OR the other way round. Today, this is still very much loved by the lomographers and myself.

Below are some shots done with Diorama Art Filter. It mimics the effects of a tilt and shift lens. If you shoot subjects from a distance, the images give you a miniature effect, like the name “Diorama” describes. I also wrote about a friend purchasing the tilt and shift lens HERE before. To show the difference between Diorama and ordinary images, see below.

Image with No Diorama Art Filter applied

Image shot in Natural Mode with No Diorama Art Filter applied, somehow I found that the E-P2's Natural Mode does not produce as rich colors as the E-P1, this is probably due to me using a pre-production E-P2 with firmware not upgraded yet.

Image with Diorama Art Filter applied

Image with Diorama Art Filter applied

Here are some other images shot in Diorama Art Filter Mode:

Singapore HDB Flats

Singapore HDB Flats

Singapore HDB Playground and Recreational Park

Singapore HDB Playground and Recreational Park
Children playing soccer

Children playing soccer

Another view of the HDB Recreational Park, Singapore HDB Flats are like condominiums!

Another view of the HDB Recreational Park, Singapore HDB Flats are like condominiums!

Just for comparison, here are also some samples of similar effects created with a 5Dmk2 and a 45mm tilt and shift lens shot by Mr Peh:

pehcw1

pehcw2

pehcw3

Summary:

1. I find the two new Art Filters very interesting and useful especially the Cross Process Art Filter, since I love the cross-processed look. The Diorama effect also can freshen up perspectives and inject new inspiration into shooting.

2. The Electronic External Viewfinder is like looking at Live View through a peep hole. It is of very high quality 100% viewing but to me, it does not make much of a difference since I hardly shoot in extreme sunlight glare conditions and so I’d rather use Live View. I have found that using Live View freshens up my perspectives in shooting by offering a whole new range of possibilities and angles achievable! I have no complaints at all on the high quality LCD Live View offered on both the E-P1 and E-P2. Don’t you forget, Olympus pioneered Live View among all other brands! And of course, now they created the highest quality external electronic viewfinder you can ever find in the market. For all those who have this thing about using viewfinder to shoot and “hate” Live Views, the E-P2 is a good option.

3. For video lovers, the E-P2 will be a much better choice since you can get much better sound quality using external mic and also have the option of using the 2 extra Art Filters plus Manual-exposure mode in the video mode for creativity. Almost all the Art Filters are useable in the HD Video Mode except the Pin-Hole Art Filter which does not produce a smooth quality video (video-recording is stunted) and also the Diorama Art Filter which records in 2 frames per second but playback in 15 frames per second. However, the Diorama Art Filter Video gives you another creative option to record a “Charlie Chaplin” kind of comical effect, but in color and creative blur. Even videos shot using Pin Hole Art Filter can appear artistic. It depends on your creativity.

4. Focus-tracking is great but I will love to have it more functional in sequential/continuous-shot mode as it’s better to shoot a few more frames for moving subjects. It’s a pity that when I use it in sequential-shot mode, the frames slow down quite a bit, in which I find it not useable.

5. And as for the i-enhance mode, it’s another great option for nicer colors (actually I find that Olympus’s colors are already very nice by default). The HDMI remote feature frees you from sitting inches-near to a HDTV if you often do on-the-spot presentations. Nice option for family get-togethers if you are often the family photographer.

Olympus is selling the E-P1 alongside with the E-P2 together, so I don’t think E-P2 is a replacement model. At about RM1k more (RRP: RM3799), it’s worth the difference if you are fanatic over the two new Art Filters OR you are a creative video person who would want to use the new Art Filters for Video and get better sound quality OR if you “MUST SHOOT WITH VIEWFINDER”. I believe the E-P1 still caters for the majority in terms of pricing.

Lastly, if RM1k is no big deal to you, BLACK IS NICE! I love BLACK! Cheers!

The Launch of Olympus PEN E-P2

I am extremely honored to be invited by Olympus to speak of my experience with the PEN on 5 Nov at the launch of the Olympus E-P2, and also not-to-forget, experiencing the E-P2 over the past 1 week on it’s new features. I must say the PEN, being the 1st micro four thirds system in the world, is gonna rock the world just like it did with it’s half-frames (72 shots) in the 1960-70s.

NEW OLYMPUS PEN E-P2, image from dpreview.com

NEW OLYMPUS PEN E-P2, image from dpreview.com

Image by Leo from Olympus Malaysia.

Image by Leo from Olympus Malaysia

I was actually busy photographing the big group of media photographers photographing us during the photo session. I should be getting those images back from them soon. The PEN is such a joy to use! You should try it.

Below are some pretty girls’ shots of the Olympus PEN E-P2 ambassadors of the day taken backstage. I am so-not-used-to dressing up formally without carrying my PEN E-P1 in my camera pouch strapped to my waist, that I only managed to steal some shots of the day intermittently whenever I can get my E-P1 out of my bag. All the PEN E-P1′s images shown in this post below are straight out of camera. No touch-ups at all.

model1

model2

model3

model4

model5

model6

It has been a truly enjoyable day meeting new friends, chatting with the Olympus Team about up and coming exciting developments, and sharing my experience with the PEN to the crowd. I must say, somehow I find the Olympus Team different. They are truly passionate about the Olympus Brand!

To them, it’s not just about selling cameras. It’s about high quality photographic instruments and human-to-human connection. Olympus is about high quality photography made available at ease to everyone and anyone.

Let me remind you, I am not paid to shoe-shine for Olympus just like I’ve earlier mentioned HERE. They just want a truly passionate genuine PEN user to share something at their meetings, and here I am.

I also have the priviledge to meet the veteran photojournalist who uploaded the first Tsunami shots online during the 2004 Tsunami. He’s none other than John W. Ishii.

Me and John

Me and John

And a photo with Hugo from Olympus Japan and Mr Tan, the managing director.

me2

Below shows the high quality huge enlargements frames of the Olympus PEN E-P1 and E-P2′s images at the launch, largest being 30 by 53 inches. Mind you, the enlargements are made from “Normal JPEG” straight out of the cameras. Not even “Fine JPEG”!

With such high quality, I absolutely don’t see the need to shoot RAW with my PEN E-P1 at all, unlike my Canon and Nikon DSLRs I used to own. I have since sold both my D700s and now back to shooting lots and lots of film (still my 1st Love), accompanied by my PEN E-P1!

mini-exhibition

mini-exhibition

mini-exhibition

mini-exhibition

Thank you Olympus Malaysia for giving me the honor to speak of my joy in photography using the PEN!

Coming soon… I will be blogging more about the PEN, both the E-P1 and E-P2.

The Power of Small Cameras

Man smoking, waiting. Olympus E-P1 at 14mm, 16:9 format, built-in art filter.

Man smoking, waiting. Olympus E-P1 at 14mm, 16:9 format, built-in art filter. I was about 2 metres from my subject.

I have recently grown much in love with small cameras like the Olympus E-P1, Leica M6, Rollei 35mini, and even the old classic legendary half-frame Olympus PEN FT, just to name some. My madness and fanaticism over small cameras is not getting any better and in fact, is getting worse… though the Leica M9 at RM25k is way out of reach. I figured that I can do the same thing by mounting my Leica lenses on my Olympus E-P1 via an adaptor and manual focus it even better than the M9 by using live view. Haha… self-consolation maybe. Or use my full-frame film Leica M6. Cheers man!

Still, I am often humbled by the fact that good images do not rely on good cameras BUT good photographers! Just browse through Flickr and you will be humbled just like me. Many of my favourite shots often come from my small compact cameras too.

Why own a perfect, what I call a “magic camera” like the Nikon D700 or D3, that when you wanna “steal a shot”, the cameras are so huge that you will be caught way before you press your shutter button! Not unless you are using a 70-200mm telephoto or even longer, and stand 50 -100 feet away. However, I also remember Robert Capa said,” If your pictures aren’t good enough, you aren’t close enough. So, I guess wide angles and standards are still my preferred choices. I like to sneak up close and personal, “steal” a shot without scaring my subjects with huge cameras, and sometimes, “ask” for a shot from my subjects. (I’ll be writing on the difference between “stealing” and “asking” for shots in another post).

So, why do I call the D700 a “magic camera”? Cause it really can continue shooting at ISO6400 or higher when all other cameras “died” in the darkest environment ever. (Of course the Canon 5Dmark2 too will continue shooting, but maybe focus blur. Kidding… cause personally I think Nikon’s AF is better).

Then the Olympus shooters will exclaim, “why shoot in such lowlight when the lighting is not even good, all flat?” And the Olympus shooters will whip out their off-camera TTL flash and boasts of the best skin tones and lighting achievable in such situations! No doubt, they will get the best-looking portraits.

I often wonder, why still shoot when all around you is so blindly dark??? Oh, then I figured that maybe you are a paparazzi or a private investigator doing your job trying to catch someone in their “act”. Lighting is no longer important, “the act” is more!

Now that I’ve been missing my big SLRs, let me try listing down it’s advantages.

ADVANTAGES OF BIG DSLRs:

1. Faster frame rates (but the loud clanky shutter sounds will give you away)

2. Size and look will boost your self-confidence or ego (if being regarded as a professional by “how you look” is more important to you than your images)

3. Faster auto-focusing (compact cameras with F8 aperture can “focus ” faster due to deeper depth-of-field)

4. More inter-changeable lens choices (an up close personal 28mm F8 shot of a stranger on the street is a 100 times more compelling than a 85mm F1.2 shot showing a reluctant face)

5. You look like a PRO, you look like a PRO, you look like a PRO. Oh, what can I say? The whole world thinks you are a PRO. You get people asking you for business cards. You don’t really have to show your images. The gear you hang on your body speaks everything. No one dares to comment openly about your images. All you will hear is,“Nice. Very professional.” (I’d rather not live in delusion)

Conclusion: Yes, I still use my big professional SLRs when the need arises (faster frame rates, lenses, etc.) But I will always want my images to speak for me, NOT my equipments.

And the power of small cameras must not be undermined! A small and insignificant camera with a quiet shutter doubles up your photographic opportunities, even triples! It also tests your communication skills with your subjects!

Event Shootout with Olympus PEN E-P1

It’s great joy and excitement to shoot with my friend Louis for a Big Nokia Event recently that I just can’t help, but to share some of the images from the Olympus E-P1 I was using.

01

04

02

The following are telephoto shots taken with a Leica 90mm F2.8 lens fitted on the E-P1 via an adaptor, and due to the 2x crop factor, it achieves a fantastic whooping 180mm! Due to that, I didn’t have to fight with the professional journalists using Huge Canon and Nikon bodies and lenses (also don’t have to fight with Louis who was using a powerful Canon 70-200mm F2.8 Lens), and still reasonably achieved close-up shots of the speakers on stage! The manual focusing on the sharp E-P1 screen made things possible.

Big Nokia Boss

Nokia Boss

Chief Designer of Nokia

Chief Designer of Nokia

Close-up during a coffee table dialogue session

Close-up during a coffee table dialogue session

Chief Designer giving a talk

Chief Designer giving a talk

Oh man… I was being twittered! I should really start twitting soon!

A Large 60-in LCD Screen connected to a laptop on twitter

A Large 60-in LCD Screen connected to a laptop on twitter

Some new products… …

05

06

07

08

12

Newborn Baby Megan

Don’t you just love babies?

First Passport Photo... haha...

First Passport Photo... haha...

Cute Megan

Cute Megan

Little Fingers

Little Fingers

Little Feet

Little Feet

Baby Crying

Baby Crying

Nice Pose

Nice Pose

Crying Loudly... ...

Crying Loudly... ...

My eyes are open now. That's me. "Hey! Who's this man with beard disturbing me?"

My eyes are open now. That's me. "Hey! Who's this man with beard disturbing me?"

Olympus really does produces excellent skin tones! Babies, babies… … We were all once like this!

Olympus E-P1, A Class of It’s Own.

Olympus PEN E-P1, image taken from dpreview.com

Olympus PEN E-P1, image taken from dpreview.com

I’ve been a professional photographer for more than 12 years, specializing mainly in portraits, weddings, people photography, whether choreographed or on-the-move. I have been a fervent Canon and Nikon user for years. But never have I encountered a small camera like the Olympus E-P1 that produces such quality in it’s size with such user-friendly features.

Talking about “Making Photography Easy”. For years, since the camera was invented, the world has been wanting to make photography easy. A view-camera needs about 11 adjustments in order to take a picture. Then came the Nikons and Canons that only require THREE adjustments: Aperture, Shutter Speed and Focus in order to take a picture. And if this wasn’t easy enough, cameras that came later began to even do all THREE adjustments for us – the Program Autofocus SLRs!

To read a detailed article on the above, click here.

Olympus E-P1, shot through car windscreen in a rain, B&W art filter

Olympus E-P1, shot through car windscreen in a rain, B&W art filter, 16:9 format.

Olympus E-P1 set to manual focus, b&w art filter.

Olympus E-P1 set to manual focus, b&w art filter, 16:9 format.

This shot shows that E-P1 is quick enough to capture action. My son did this action in a split-second. Tough not as fast as a DSLR, it is not that bad afterall.

This shot shows that E-P1 is quick enough to capture action. My son did this action in a split-second. Though not as fast as a DSLR, it is not that bad after all.

I often ask myself, “Why do camera-designers always want to make things easier for us?”

Especially as a earning professional photographer, doesn’t it seem obvious that as photography gets easier and easier, our commanding prices go lower and lower since more and more people think that they can “do-it-yourself” anyway?

But if I think as an artist, I just want to focus on my feelings, my imaginations, my visions and indulge in all my five senses when I go out and create images with my camera.

Isn’t it so much easier to have a camera that doesn’t interfere with my thoughts, by introducing questions like what aperture to use and what shutter speed to set or whether the image is in focus?

Okay, you may disagree with me on this cause deciding how blur the background we want it to be or whether to use a slower shutter speed to depict movement, or whether to set it off-focus in order to create some abstractness do play a part in our creativity process.

But my point is, sometimes it really helps if you just indulge in all your five senses without being distracted by technical functionalities, and shoot what you feel!


Olympus E-P1, B&W art filter. I pre-focused the camera to infinity before reaching out to shoot the birds returning to their home using the grainy black and white art filter mode.

Olympus E-P1, B&W art filter, 6:6 format. I pre-focused the camera to infinity before reaching out to shoot the birds returning to their home using the grainy black and white art filter mode.

Who says you can't see beautiful sunset downtown KL? Shot using "Sunset" Mode in Olympus E-P1

Who says you can't see beautiful sunset downtown KL? Shot using "Sunset" Mode in Olympus E-P1, 16:9 format.

Shot using "Pop Art" art filter, Olympus E-P1. This is a spontaneous shot, again done within seconds spotting the chef's head covered by a bunch of roast pork

Shot using "Pop Art" art filter, Olympus E-P1, 16:9 format. This is a spontaneous shot, again done within seconds spotting the chef's head covered by a bunch of roast pork

Olympus E-P1, shot using "landscape" mode. It really does make the sky much nicer.

Olympus E-P1, shot using "landscape" mode. It really does make the sky much nicer., 6:6 format

In today’s digital professional photographer’s context, things have just gone a lot worse! Our modern DSLRs contains at least 100 menu and function options! It throws you questions like “D-Lighting Off, Default, Auto, On, Normal?”, followed by trick questions like “Compression: Lossy or Lossless?”… etc. and etc.

Today, many professional digital photographers began to take pride in “setting their camera professionally” rather than concentrate on creating excellent images. Photography seems to have “developed more professionally” in recent digital days, cause to operate a DSLR is 100 times more difficult than an old film SLR!

And so we started thinking, maybe we can charge our clients more, since photography has gone so “difficult”! We started to tell our clients how high-end our equipments are, how difficult to use them, how expensive they cost, in order to justify and convince our clients to buy our services. I always thought as a proficient photographer, shouldn’t we be confident that our clients engage us because our works are good, not because of what equipment we own?


Olympus E-P1, B&W art filter

Olympus E-P1, B&W art filter 6:6 format

Olympus E-P1, B&W art filter

Olympus E-P1, B&W art filter, 4:3 format

The Olympus E-P1 is a camera so small that it fits into your bag easily. I have been carrying it and using it almost everyday since I bought it about 2 months ago. I use it for shooting “nonsense” in my daily life, use it for casual street shooting, and even use it for my professionally-paid wedding jobs!

I was caught previewing on the E-P1. DON'T SPEND TIME ON PREVIEWS! CONCENTRATE ON GETTING YOUR SHOTS!

I was caught previewing on the E-P1. DON'T SPEND TIME ON PREVIEWS! CONCENTRATE ON GETTING YOUR SHOTS!

FOR THE GEEKS:

The ISO is absolutely usable up to 3200. The default setting already produces fantastic images. It’s Auto ISO is also pretty reliable (I hardly have to switch it about). It’s IS (image stabilization) is most impressive! I ever use it down to 1/2 sec and still get a reasonably sharp picture.

You can choose to set “Graduation” to “Normal” instead of “Auto” to get deeper blacks but personally I prefer “Auto” as I prefer to increase contrast in Adobe Lightroom when necessary. I find that images can get too contrasty sometimes if I set it to “Normal”.

Olympus E-P1, Pin-hole effect art filter

Olympus E-P1, Pin-hole effect art filter, 4:3 format

Olympus E-P1, Pin-hole effect art filter, 6:6 format

Olympus E-P1, Pin-hole effect art filter, 6:6 format

Olympus is amazing in it’s in-camera processing! It produces such good Jpegs that you almost have no necessity to shoot in RAW for easy post-processing. It’s absolutely a camera for people who just want to concentrate on ARTS and have minimal worries on camera settings or post-processing.

Also, you can choose to shoot in 4:3 format (default), 16:9 format, 3:2 format or 6:6 format for your creativity.

I fell in love with E-P1 files once I laid my eyes on it in a camera store downtown and immediately ordered one for myself. I find that Olympus’s digital files are processed in such a way, closest to what film achieves comparing to other brands. Being a fervent film shooter, I can easily appreciate Olympus’s efforts in processing their digital files closest to what film achieves. (But if you really like film, shoot film! Digital still has it’s digital characteristics in it.)

I have used the Canon 5D, the Nikon D700 (owned 2 of each at my craziest times). I have gone through post-processing my images since “Adobe Photoshop 5″ days. I would say this digital route for me since the Canon D60 (if anyone still remembers what it is) has been crazy! (I plan to write about my crazy path of switching from film to digital in a later post, so keep me bookmarked if you are interested).

What I can say is that after comparing the Canon files, the Nikon files and the Olympus files, I love the Olympus files the most! (Olympus is not paying me to say this)

I love the noise (It’s different from the Canon or Nikon’s noise), I love the skin tones, I love the contrast, I love the blacks (Nikon and Canon somehow captures blacks as grays), I love the colors and I love it’s Grainy Black and White and Pin-hole Art Filters!

Shot by my wife using "sunset mode". She's not a photographer, if you know what I mean.

Shot by my wife using "sunset mode". She's not a photographer, if you know what I mean.

Then, I love it’s handsome looks and it’s size too.

The best camera is the camera you can easily grab and use when opportunity arises. If you are looking for a camera that can boost your creativity, and it’s light and easy to carry around, with quiet and unobtrusive shutter sound, achieves jpeg files that require minimum post-processing, plus an added convenience of HD video recording (get an adaptor for leica m-mount lenses and you can easily achieve cinematic effects with F1.4 blur)… … … …

THIS CAMERA IS FOR YOU!